
Got a Drone – Now What? Mapping with your UAV
It was inevitable that the proliferation of drone technology would quickly permeate the field of geospatial data acquisition and mapping. Just like a map, a drone offers a bird’s-eye view of an area of interest, allowing the lay of the land to be scrutinized and analyzed from a remote perspective. Ironically, this eye-in-the-sky technology, which enables us to see the world like a map spread out below, has opened the door to a new form of mapping, one in which the experience is much more
Our world is a three-dimensional entity, and today’s mapping technology allows us to visualize, analyze, and interact with geospatial data from a three-dimensional, first-person perspective. At the forefront of this seminal shift towards 3D GIS is Global Mapper, a powerful application developed by Blue Marble Geographics. In this article, we introduce a specific component of Global Mapper called Pixels to Points, with which we walk through the steps for transforming drone-collected images into 3D data.
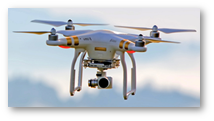
When considering 3D geospatial data, most GIS practitioners are familiar with lidar. While the requisite laser scanning hardware has reached the level of miniaturization that allows it to be deployed on a drone, lidar acquisition is still expensive and beyond the reach of most. A simple, off-the-shelf drone equipped with an inexpensive camera provides the means to create a similar 3D point cloud, but at a fraction of the cost.
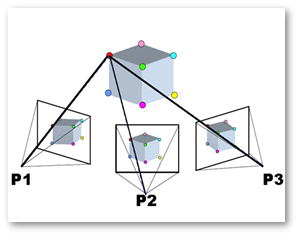
The underlying methodology that is applied in this procedure is called Structure from Motion (SfM), and it is based on the simple principle that viewing an object from multiple perspectives allows it to be reconstructed as a three-dimensional object. This photogrammetric process, which is at the heart of the Pixels to Points tool, involves the identification of patterns of pixels in overlapping, geo-tagged images, and the subsequent measurement of relative distance from the camera to the detected surface represented by those pixels. The result is a high-density array of points or point cloud in three-dimensional space.
When collecting images for use in the Pixels to Points process, there are a few logistical considerations that must be addressed:
- Image overlap
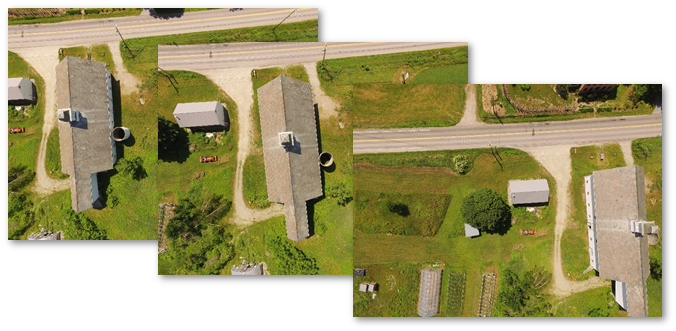
To ensure sufficient recurring coverage of identified features, each image must have at least 60 percent overlap with adjacent images.
- Camera orientation
While nadir or top-down images are usually recommended for terrain or bare earth applications, oblique images will provide better point density for vertical objects such as buildings.
- Atmospheric conditions
Because the process is based on image analysis, any variation in the colors detected in adjacent images will potentially corrupt the output. This might be caused by intermittent cloud cover temporarily darkening the scene, so consistent light conditions are preferable.
- Moving objects
Because there is a time differential between the collection of each successive image, any moving objects, such as vehicles or people, will appear in a different location in the subsequent images and will cause distortion in the output files.
- Ground control
To ensure the positional accuracy of the derivative products, ground control points can be identified or manually placed in dispersed locations throughout the target area before the images are captured. The three-dimensional coordinates of these points are then tied to the corresponding locations identified in the appropriate images, and are used to adjust the coordinates of the point cloud.
- Identifiable features
While it may seem obvious, it is important that the collected images contain recognizable features. A consistent solid-color surface, such as a body of water, paved area, or snowfield, will not provide sufficient contrast to allow the local texture of the surface to be identified.
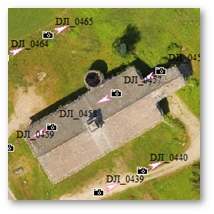
After transferring the images from the drone, the procedure for reconstructing the target area using the Pixels to Points tool is remarkably straightforward. A recommended first step is to load the images into the map view in Global Mapper as picture points, based on their embedded coordinates. This allows the location and footprint of each image to be overlayed on a base map to assess the degree of overlap.
The images are subsequently loaded into the Pixels to Points tool and the necessary settings can be applied to fine-tune the output:
- The resolution of the images can be lowered to reduce the processing time and memory requirements.
- The color balance between images can be harmonized to account for variations in color and image quality.
- Ground control points can be added, and the locations identified and tagged in the appropriate images.
- Portions of images that are not required, such as those beyond the area of interest, can be masked by either drawing a physical area within each affected image or by choosing a color range.
The most important setting is the selection of the required output files, of which there are three options:
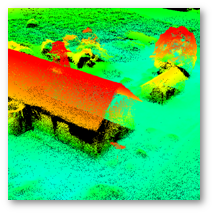
- Point cloud
As previously noted, this is the primary output from the Pixels to Points process and is similar in geometric structure to lidar. Global Mapper offers numerous tools to improve the quality of the generated point cloud, including noise removal, automatic classification (ground, buildings, etc.), cropping, thinning, etc. Ultimately, the point cloud can be converted into a raster digital terrain model (DTM) and used for contour creation, volume calculation, and much more.
- Orthoimage
By definition, an orthoimage is an image that has been geometrically corrected so that the scale is correct throughout its extent. The orthoimage generated in the Pixels to Points tool is a gridded version of the colorized point cloud.
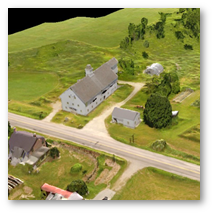
- 3D Model or Mesh
A complex vector feature that represents the three-dimensional structure of the area as faces upon which the colors derived from the original images are rendered. When displayed in Global Mapper’s 3D Viewer, the mesh provides a stunning 3D representation of the target area.
UAV hardware is rapidly improving even as the costs continue to drop. A drone can be deployed quickly and easily for on-demand data collection, eliminating the logjam that is typical of traditional collection methods. Used in conjunction with Global Mapper’s Pixels to Points tool, this technology is becoming a valuable addition to our geospatial toolbox.

Be the first to comment